

Have you ever needed to give someone temporary access to your WordPress website? You can do this without sharing your password. This way, you keep your account secure.
Creating temporary login credentials can be important. This is true when you work with a support staff member, developer, author, or content creator. For that reason, you must provide another person with an account login.
However, how can this be done effectively and safely? In this post, we’ll explore several ways to generate temporary WordPress login credentials. This will help you manage access without any worries.
Understanding the Uses of Temporary Login Details
User credentials that grant temporary access to your WordPress website are known as temporary login details.
They can be helpful in certain situations. For example, when working with temporary content collaborators. They can also help when getting support from teams. Additionally, they are helpful when hiring a freelancer for a project.
You have more control over who can access your website when you use temporary logins.
Why Create Temporary Login Credentials?
The reason for creating and sharing access to different users rather than normal is only in one case. Suppose you own several websites hosted on your hosting. Then, you might not be allowing other people to access your data for your business.
For example, you want to buy paid subscriptions from a third party like plugins, themes and others. From this perspective, you may need to create temporary accounts to provide website login access. There are various advantages to creating temporary login credentials:
Security: You reduce the possibility of unwanted access to your primary account.
Control: Establish a time limit for access, making sure that users are only granted the essential permissions for the duration of their stay.
Convenience: This avoids the trouble of disclosing your main login credentials, which may result in security lapses.
How to create Temporary Login details
You can generate temporary login credentials for your WordPress website in a number of ways. Let’s examine a few widely used techniques:
In this article, we will guide you through all the ways how to create temporary logins for your WordPress website.
- Using Plugins
- Manual User Creation via the WordPress admin dashboard
- Using Code Snippets
Plugin Utilization
The simplest method for creating temporary login credentials is to use plugins. Here are a few well-liked choices:
Temporary Login Without Password admin access link :
A WordPress plugin can be used to provide a temporary login link that does not require a password. Until the period you specify, the user can safely visit your website.
This technique might be quite helpful when you neglect to delete users from your WordPress website’s user list after completing a task. After a while, the link for temporary admin access stops functioning.
So let’s get started with the how-to guides.
First thing first , from your WordPress Dashboard, you will need to go to Plugins > Add New.

Search for the “Temporary Login Without Password” plugin. Click on Install Now and then Activate it.
Upon activation, navigate to Users > Temporary Logins page.
Add a new temporary login account by clicking on the Create New button.

You will see a form appears on this page. You need to fill out this form to create temporary login

- Enter the Email, First Name, and Last Name of the user or person you want to add.
- Next, Select a user role from the dropdown.
- Then, you need to select an expiry duration from the dropdown. The access to the user account will expire after that duration.
- You also can set a default language for this temporary login from the Language option.
Click on Submit button after filling out this form.
Now You will be redirected to the page where you can see a success message and a URL.
You will need to copy the URL by clicking “Click to Copy” button and share it to the person you want to give temporary login access.

The login account will automatically expire after the expiry period you have selected.
Managing Temporary Logins
You can see the list of temporary login users. You can also check their expiry times. This information is available on the Users > Temporary Logins page until the account expires.

From the Action column, you can disable an account, delete an account, and update the account expiry time and role capabilities.
All posts and pages made by the user will be changed to the administrator as the author. This will happen after the temporary account is permanently deleted.
Editor of User Roles: This plugin helps you establish new users’ access levels and assign them roles. You can create temporary users with limited powers. For example, they can only publish posts. You can also deactivate these users when needed.
Manual User Creation via the WordPress admin dashboard
Using the WordPress admin dashboard, you may manually create temporary user accounts:
1. Enter with WordPress login access. From the left panel, navigate to the menu bar of WordPress and select Users > ‘ Add New ‘.
2. From Add New, an Add New user form will pop up. Fill out all the mandatory and optional blanks, such as username, first name, last name, and email. Based on the user’s requirements, select a role (such as Contributor or Editor). After that, provide their username and email.
Note: Don’t get confused about assigning the appropriate user role for the person you want to add. If you do not know the different types of permissions and what a user can do for that particular role, you can check from this link: WP Roles and Capabilities
3. The password is not a priority here. However, a short-term password is preferred.
Before the user logs in for the first time, tell them about their new credentials. Provide the username or email and password to the person you want to give access to your website.
5. The user can log in with the username and password from their device with the admin login URL (e.g. https://yourwebsite.com/wp-admin)
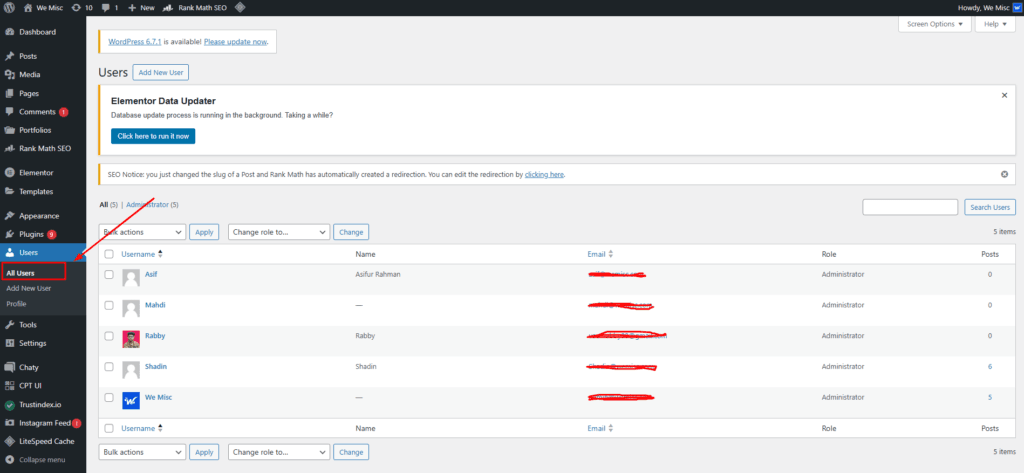
6. If you need to check all the users, Go to Users > All Users to check all the login details you have created in WordPress.
Although this approach is simple, you will have to remove or deactivate users afterwards manually.
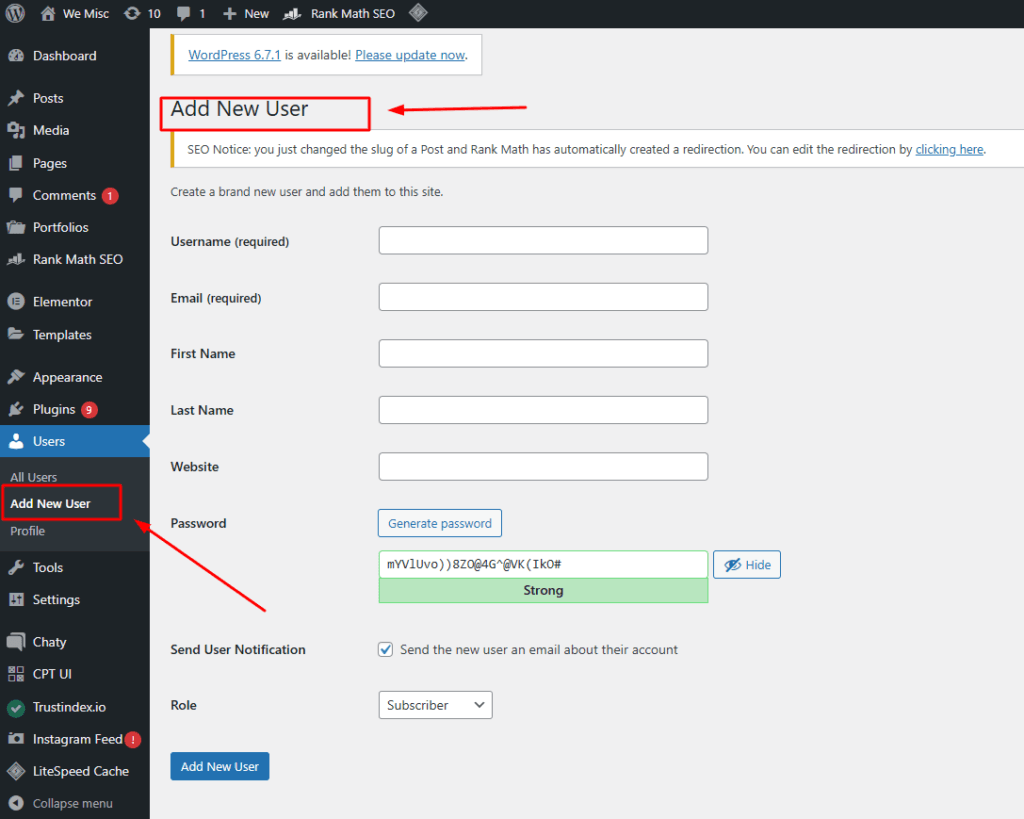
It will show up an Add New User form. After Filling out the necessary fields Click on the “Add New User” button.
Note: Make sure to set the proper user role for the person you want to add. If you have no idea what permissions a user role has, you can check from this link WP Roles and Capabilities
After you add a user account, give the username and password to the person who needs access to your website.
The user can log in with the username and password from their device with the admin login URL (e.g. https://yourwebsite.com/wp-admin)
Go to Users > All Users to check all the login details you have created in WordPress.
Using Code Snippets
For more tech-savvy users, you can create temporary logins using code snippets. The following snippet can be added to your theme’s `functions.php` file:
“`php
function create_temp_user($username, $password, $email) {
$user_id = wp_create_user($username, $password, $email);
// Grant specific capabilities or roles as needed
$user = new WP_User($user_id);
$user->set_role(‘subscriber’); // Adjust based on needs
}
“`
This method requires knowledge of PHP and WordPress coding techniques. Be cautious and always back up your site before entering a custom code.
The Best Ways for Managing Temporary Logins
Take into account the following best practices to handle temporary login credentials efficiently:
Set Expiration Dates: Ensure that temporary accounts have clear expiration dates. They will automatically become inactive after that date.
Restrict Permissions: Give the bare minimum of access required. Make good use of roles; for example, use Contributor rather than Administrator.
Monitor Activity: Monitor users’ behaviours to ensure they are only doing what is expected of them.
Communicate Clearly: Users should be made aware of their permissions and any restrictions associated with their temporary access.
How to Temporarily Deny Access
Removing access is an essential step after the project or task is finished:
Utilizing Plugins: Some plugins have built-in features to revoke access if you use one immediately. For instructions, consult the documentation for your plugin.
Manual Removal: Go to Users > All Users in your WordPress dashboard to view users created manually. After hovering over the username you want to delete, click Delete.
Disable Access via Code: If you created temporary users with a code, you might need to delete them yourself. Alternatively, you can create another code snippet to deactivate their accounts.
Typical Errors to Avoid
Watch out for the following errors when setting up and maintaining temporary logins:
Building Excessively Permissive Accounts: Unless absolutely required, do not grant temporary users administrator-level access.
Ignoring Expiration Dates: Accounts that remain open indefinitely pose security threats.
Not Monitoring User Activity: To avoid illegal acts, always monitor what temporary users are doing on your website.
Take the next step
Creating temporary login credentials for your WordPress website is an important step. It helps keep your site secure when you work with others.
Ensure your website’s safety and usability is vital, whether you employ plugins, manual techniques, or code snippets.
Follow the rules in this article. This will help you give time-sensitive access or create temporary login details for your WordPress website. You can do this without risking its security.
Effective temporary account management promotes safer teamwork and safeguards your priceless assets. Take charge of who can visit your WordPress website by implementing these strategies right now!
Check out our other blogs on various create temporary login details we have published.
